오늘은 파이썬으로 메시지를 보내 보도록 하겠다... 어디로 내 안드로이드 폰으로 다가... 그래서 먼저 안드로이드에서 하는 FCM에 대한 이해를 조금해 보아야 하지 않을까 싶다.
https://billcorea.tistory.com/80
안드로이드 앱 만들기 Firebase FCM 으로 메시지 전송하기
Fcm 으로 메시지를 수신하는 예제들은 많이 찾아 볼 수 있으나, 보내는 건 ? 그것도 안드로이드 앱으로 그런 예제는 없는 것 같아서 정리를 해 보겠다. 다만, 전체를 다 정리하는 것이 아니라 꼭
billcorea.tistory.com
옆집(?)에 잠시 가 보면 안드로이드에서 하는 메시지 보내는 것에 대한 이야기가 있으니 참고...
import firebase_admin
from firebase_admin import credentials
from firebase_admin import db
from firebase_admin import messaging
import datetime

#Firebase database 인증 및 앱 초기화
cred = credentials.Certificate('./services_firebase.json')
firebase_admin.initialize_app(cred,{
    'databaseURL' : 'https://my-.........firebasedatabase.app/'
})


def mesgSend(token):
  registration_token = token

  # See documentation on defining a message payload.
  message = messaging.Message(
      notification=messaging.Notification(
        title='$GOOG up 1.43% on the day',
        body='$GOOG gained 11.80 points to close at 835.67, up 1.43% on the day.',
    ),
    android=messaging.AndroidConfig(
        ttl=datetime.timedelta(seconds=3600),
        priority='normal',
        notification=messaging.AndroidNotification(
            icon='stock_ticker_update',
            color='#f45342'
        ),
    ),
    apns=messaging.APNSConfig(
        payload=messaging.APNSPayload(
            aps=messaging.Aps(badge=42),
        ),
    ),
    data={
        'URL':'https://billcorea.tistory.com',
        'BODY':'message is Body'
    },
    #topic='allDevices',
    token=registration_token,
  )

  # Send a message to the device corresponding to the provided
  # registration token.
  response = messaging.send(message)
  # Response is a message ID string.
  print('Successfully sent message:', response)


userInfo = db.reference('UserInfo')
#print(type(userInfo.get()))
for val in userInfo.get().values():
    mesgSend(val['userToken'])
소스에 대한 이해는 나중에 하고, 일단 따라해 보자면.
위에 대한 소스를 작성을 해서 해 보면 된다. 소스를 보면서 준비를 해 보자...
1. 서버 인증서 만들기
./services_firebase.json 이 파일이 있으면 인증서를 대신할 수 있다. 이건 어디서 얻는 것인가 ? firebase의 console 에서 프로젝트 설정을 가면 서비스 계정이라고 탭이 있고 거기서 새 비공개키 생성 을 클릭 하면 자동으로 생성이 되는 json 파일 있다. 그 파일의 이름은 프로젝트 이름을 따라서 생성이 되기 때문에 길다... 그걸 좀 줄였다. 이 파일은 android 개발할 때도 받았던 파일 이였다. 같은 걸 쓰면 될 것을...

2. 메시지 수신할 상대방을 어떻게 알 것인가 ?
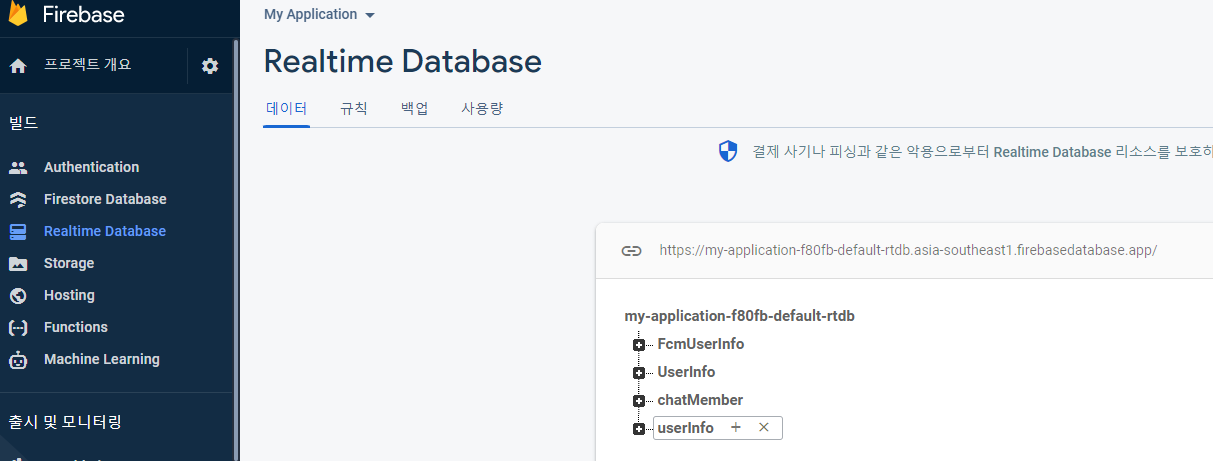
안드로이드 개발페이지 에서 기술한 것 처럼 topic 을 구독하는 방식을 구현 했다면 topic 으로 전달 할 수 있고, 그렇지 않다면 개발 기기 마다 등록한 token 을 알아야 한다. 그래서 이 소스에서는 firebase의 realtime database 에 userInfo 라는 정보에 그런 정보가 있다는 가정하에 코드를 작성하였다. 그래서 userInfo 라는 realtime database 을 읽어서 userToken을 받아오는 부분이 기술 되어 있다.
import ...

cred = credentials.Certificate('./services_firebase.json')
firebase_admin.initialize_app(cred,{
    'databaseURL' : 'https://my-a.........................firebasedatabase.app/'
})

userInfo = db.reference('UserInfo')
#print(type(userInfo.get()))
for val in userInfo.get().values():
    mesgSend(val['userToken'])
이부분에서 databaseURL 은 어디서 가져 왔는 가 ? firebase의 console 에서 realtime database 을 클릭해 보면 처음 화면에 아래 그림 처럼 https://... 으로 시작하는 URL 이 기술 되어 있으니 그걸 복사해서 붙이면 끝.

3. 메시지 보내기
이제 token 도 얻어 왔으니 (실제 얻어 오는 건 안드로이드 개발 부분에서 참고 하시길 ...) 메시지를 보내 보자. function 으로 define 해 두면 나중에 복사해 쓰기 쉬우니... 이렇게 코드를 작성했다. 여기서 token 은 userInfo 에서 얻어온 것이고... 아래 부분은 잘 알 수도 있지만, notification 에 있는 건 안드로이드 폰에 알림창에 표시되는 내용이고
androidConfig 는 잘 모르겠지만, 안드로이드에서 보여줄 때 사용될 설정인 것 같고, 아래 data= 에 들어가는 건, 자기가 개발하는 앱에 전달할 데이터 부분으로 사용하면 될 것 같다.
def mesgSend(token):
  registration_token = token

  # See documentation on defining a message payload.
  message = messaging.Message(
      notification=messaging.Notification(
        title='$GOOG up 1.43% on the day',
        body='$GOOG gained 11.80 points to close at 835.67, up 1.43% on the day.',
    ),
    android=messaging.AndroidConfig(
        ttl=datetime.timedelta(seconds=3600),
        priority='normal',
        notification=messaging.AndroidNotification(
            icon='stock_ticker_update',
            color='#f45342'
        ),
    ),
    apns=messaging.APNSConfig(
        payload=messaging.APNSPayload(
            aps=messaging.Aps(badge=42),
        ),
    ),
    data={
        'URL':'https://b.............com',
        'BODY':'message is Body'
    },
    #topic='allDevices',
    token=registration_token,
  )

  # Send a message to the device corresponding to the provided
  # registration token.
  response = messaging.send(message)
  # Response is a message ID string.
  print('Successfully sent message:', response)
4. 마치며.
음... 그런데, 아쉽게도 windows 에서는 검증을 해 보지 못했다. firebase_admin 패키지를 설치해야 하는데, windows11 에 python 3.9 을 설치한 지금은 이상하게도 firebase_admin 패키지 설치가 되지 않는다. 이유는 아직 모른다. 그래서 linux 가 설치된 rasberry pi 3B 을 이용해서 확인했고, 전달이 잘 되는 것도 확인 했다.

이번에는 폰에 메시지가 도착하고 확인하는 예제 화면을 잠시 ... 감상(?)하는 것으로 마무리...
'파이썬 스크립트' 카테고리의 다른 글
| 파이썬으로 sqlite 테이블에 칼럼을 새로 추가 하기 (3) | 2021.12.21 |
|---|---|
| 파이썬 자동화 스크립트 : 메일 보내기 (0) | 2021.12.20 |
| 파이썬 자동화 스크립트 : 티스토리 글을 네이버블로그에 퍼 담아 보자 (2) | 2021.12.18 |
| 파이썬 자동화 스크립트 : 인스타그램 사진 올리기. (0) | 2021.12.17 |
| 파이썬 으로 따라하는 자동화 스크립트 : 다음 랭킹 뉴스 수집 (5) | 2021.12.16 |