오늘은 새로운 댓글이 달리는 것들을 하나씩 열어 보는데 힘들어하는 나를 위해서 앱을 하나 구현해 볼까 합니다. 최종적으로는 댓글에 대한 답글로 자동화해 보는 것이 바람입니다. ㅋ~ (이런 건 그다지 좋아라 하지 않으시기는 하던데 뭐...)
댓글 달기가 본업(?)이 아닌지라... python 으로는 여러 가지 공부를 해 보기는 했으나, 이번에 kotlin 코드를 작성해 보았습니다.
그래 들 설정 추가 하기
// jsoup
implementation 'org.jsoup:jsoup:1.16.1'
python에서 사용했던 Betifulsoup 가 비슷한 라이브러리가 있음을 알게 되었습니다. 저걸 build gradle 파일에 추가합니다.
// coroutines
implementation 'org.jetbrains.kotlinx:kotlinx-coroutines-android:1.7.3'
implementation "org.jetbrains.kotlinx:kotlinx-coroutines-core:1.7.3"
이것들은 async 처리를 하기 위해서는 필요합니다. async 보다는 android 가 UI 가 활성화 되어 있는 경우 처리 지연이 발생하는 것을 그다지 좋게 보지 않기 때문에 지연처리를 할 수 있도록 한다고 보는 것이 이해가 쉬울 듯합니다.
이전 게시글 (파이썬으로 댓글 답 달기)
다음은 새 댓글을 읽어오는 부분을 구현해 보아야 하는데, 이전 글 하나를 잠깐 보고 오겠습니다.
https://billcorea.tistory.com/100
파이썬 으로 따라하는 자동화 스크립트 : 댓글에 답글 달기
오호라... 피트에 있는 글들에 글을 달기 시작했더니, 방문해 주시고 댓글도 달아주시고... 감사 감사... 이런걸 말로만 해서는 안되고 댓글에 또한 댓글로 인사를 해야 할 것 같앗 티스토리 API 을
billcorea.tistory.com
python 으로 게시물 댓글에 자동 답글을 다는 이야기를 적었던 부분인데, 예전에 기술했던 글이라 정리가 좀 미흡해 보이기는 합니다. 이제 필요한 것은 accessToken을 얻어야 하는 데, 이 부분이 번거로운 부분이 될 듯합니다. 그 이야기는 뒤에 다시 해 보도록 하겠습니다.
tistory API 인증 알아보기
accessToken 을 받기 위해서는 인증을 거쳐야 합니다. 저 python 예시 나와 있는 이런저런 코드에 대한 설명이 부족하여 보기는 힘들어 보이지만.
https://tistory.github.io/document-tistory-apis/auth/authorization_code.html
Authorization Code 방식 · GitBook
No results matching ""
tistory.github.io
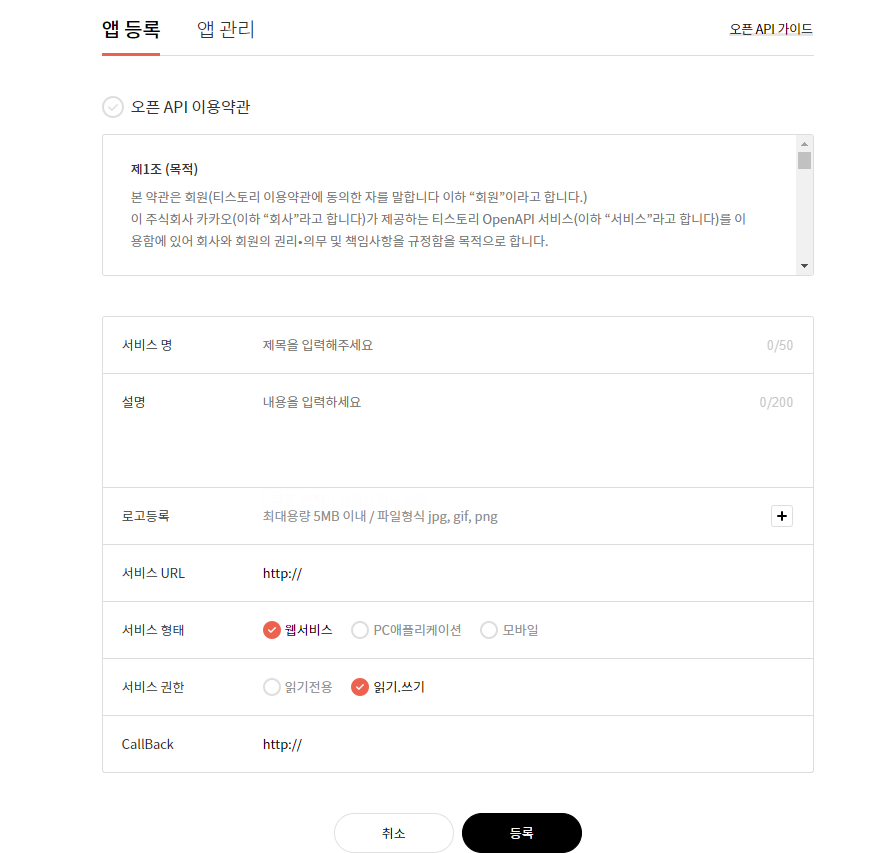
그전에 앱 등록을 해야 합니다. https://www.tistory.com/guide/api/manage/register 에서 아래 그림과 같이 나오면 등록을 해 줍니다.


이렇게 등록해 주면 App ID, Secret Key을 얻게 됩니다.
먼저 아래 URL 을 만들어 크롬이나, 에지 등에서 검색을 해 봅니다.
https://www.tistory.com/oauth/authorize?client_id=&redirect_uri={1}&response_type=code&state=someValue여기서 {0} 에는 app ID 값으로 치환하고, {1}는 위에 등록한 callback 주소를 입력하면 됩니다. 잘 입력을 했다면 아래 그림처럼 권한 허가를 요구하는 페이지가 보일 겁니다.

잘 되었다면 아래 그림과 같이 다음 페이지로 돌아 옵니다. 이때 URL에 표시된 내용들 중에 code= 뒤에 따라오는 숫자를 복사해 두어야 합니다.

다음은 아래 코드와 같이 url 을 조립해야 합니다.
https://www.tistory.com/oauth/access_token?client_id={0}&client_secret={1}&redirect_uri={2}&code={3}&grant_type=authorization_code{0} 위에서 처럼 app id 을 넣고 {1] 위에서 확인되는 Secret Key 값을 넣습니다. {2} 에는 callback 주소로 치환하고 {3} 에는 방금 얻어온 code 뒤에 값을 채워 url을 만든 다음 크롬이나 에지 등에 입력하면 accessToken을 얻을 수 있습니다.
새로운 댓글 목록 받아 오기
이제 API 가이드를 보면서 댓글 목록을 받아 오겠습니다. REST API 을 호출하도록 하고 있어서 저는 retrofit을 이용해서 해 보고자 합니다.
// retrofit
implementation 'com.squareup.retrofit2:retrofit:2.9.0'
implementation 'com.squareup.retrofit2:converter-gson:2.9.0'
gradle 파일에 최근 버전으로 추가 했습니다. 그리고 API 호출을 위해서 코드 하나를 작성했습니다.
import com.google.gson.Gson
import com.google.gson.GsonBuilder
import okhttp3.OkHttpClient
import okhttp3.ResponseBody
import retrofit2.Call
import retrofit2.Converter
import retrofit2.Retrofit
import retrofit2.converter.gson.GsonConverterFactory
import retrofit2.http.GET
import retrofit2.http.Headers
import retrofit2.http.Query
import java.lang.reflect.Type

interface RetrofitAPI {

    @Headers("Content-Type: application/json;charset=UTF-8")
    @GET("comment/newest")
    fun doGetNewest(
        @Query("access_token") accessToken : String,
        @Query("output") output : String,
        @Query("blogName") blogName : String,
        @Query("page") page : Int,
        @Query("count") count : Int,
    ): Call<NewestResponseMain>

    companion object {
        private const val baseURL = "https://www.tistory.com/apis/"
        private val client = OkHttpClient.Builder().build()
        private val gson : Gson = GsonBuilder().setLenient().create()

        private val nullOnEmptyConverterFactory = object : Converter.Factory() {
            fun converterFactory() = this
            override fun responseBodyConverter(type: Type, annotations: Array<out Annotation>, retrofit: Retrofit) = object :
                Converter<ResponseBody, Any?> {
                val nextResponseBodyConverter = retrofit.nextResponseBodyConverter<Any?>(converterFactory(), type, annotations)
                override fun convert(value: ResponseBody) = if (value.contentLength() != 0L) {
                    try{
                        nextResponseBodyConverter.convert(value)
                    }catch (e:Exception){
                        e.printStackTrace()
                        null
                    }
                } else{
                    null
                }
            }
        }

        fun create(): RetrofitAPI {
            return Retrofit.Builder()
                .baseUrl(baseURL)
                .addConverterFactory(nullOnEmptyConverterFactory)
                .addConverterFactory(GsonConverterFactory.create(gson))
                .client(client)
                .build()
                .create(RetrofitAPI::class.java)
        }

    }

}
그리고 데이터를 받아올 구조체 하나가 필요 합니다. 그래서 다음과 같이 만들었습니다.
data class NewestResponse(
    val id : String, // 댓글 ID
    val date : String, // 댓글 작성시간 timeStamp
    val postId : String, // 작성된글 ID
    val name : String, // 작성자
    val homepage : String, // 작성자 홈페이지 주소
    val comment : String, // 댓글 내용
    val open : String,  // Y 공개, N 비공개
    val link : String,
)

data class NewestResponseMain(
    val tistory : NewestItem
)

data class NewestItem(
    val item : NewestComments
)

data class NewestComments(
    val url : String,
    val secondaryUrl : String,
    val comments : ArrayList<NewestResponse>
)
실제 호출에서는 NewestResponseMain 을 이용합니다. 사유는 API 가이드를 보면 json 응답 모양을 보고 만들었습니다.
아래 응답 예시를 보면 tistory 를 큰 block으로 해서 item 아래 comments 아래 comment을 들어가야 세부 목록을 볼 수 있습니다. 그래서 모양은 이렇게 구현했습니다.
응답값 예
{
  "tistory":{
    "status":"200",
    "item":{
      "url":"http://oauth.tistory.com",
      "secondaryUrl":"",
      "comments":{
        "comment":[
          {
            "id":"8176926",
            "date":"1303796900",
            "postId":"4",
            "name":"Tistory API",
            "homepage":"http://oauth.tistory.com",
            "comment":"비루한 글에 칭찬을 하시니 몸둘바를 모르.. 지 않아!",
            "open":"Y"
          },
          {
            "id":"8176923",
            "date":"1303796801",
            "postId":"4",
            "name":"글쎄 요",
            "homepage":"http://shesgone.com",
            "comment":"제 홈에 와서 구경해보세요^_^",
            "open":"N"
          },
          {
            "id":"8176918",
            "date":"1303796711",
            "postId":"4",
            "name":"지나다가",
            "homepage":"http://someurl.com",
            "comment":"좋은 글 감사합니다.",
            "open":"Y"
          }
        ]
      }
    }
  }
}
이제 호출을 구현해 보겠습니다.
RetrofitAPI.create().doGetNewest(accessToken = accessToken, output = "json", blogName = "billcorea", page = pageIndex, count = 15)
    .enqueue(object : Callback<NewestResponseMain> {
        override fun onResponse(
            call: Call<NewestResponseMain>,
            response: Response<NewestResponseMain>
        ) {
            if (response.code() == responseOk && response.body() != null) {
                newests.clear()
                for (item in response.body()?.tistory?.item?.comments!!) {
                    if (item.name != "Billcorea") {
                        newests.add(item)
                    }
                }
                Log.e("", "size = ${newests.size}")
            } else {
                Toast.makeText(context, context.getString(R.string.msgDoNotData), Toast.LENGTH_SHORT).show()
            }
            isActivie.value = false
        }

        override fun onFailure(call: Call<NewestResponseMain>, t: Throwable) {
            Toast.makeText(context, context.getString(R.string.msgDoNotData, t.localizedMessage), Toast.LENGTH_SHORT).show()
        }
    })
output 은 json 타입으로 받아서 분석을 할 예정이라 json으로 기술되었으며, blogname 은 우리 블로그 URL의 prefix을 적어 둡니다. 이제 응답이 오면 어떻게 될까요?

이제 이 앱을 통해서 더 열심히(?) 찾아보도록 하겠습니다. 저기 URL 주소를 클릭하면 해당 블로그의 제일 마지막 게시글을 찾아서 이동합니다. (아직 개발 중이라 안 되는 페이지도 있을 수 있습니다. 블로그 마다 테마 설정에 따라 tag 값들이 달라지기 때문에 안되는 페이지는 하나씩 보완을 해야 할 것 같습니다.)
'모바일 앱(안드로이드)' 카테고리의 다른 글
| 안드로이드 앱 만들기 : Azure 플랫폼 - Microsoft Azure 안드로이드 에서도 가능(?) (102) | 2023.08.30 |
|---|---|
| 안드로이드 앱 만들기 : 스크래핑 2번째 이야기 URL 열어 보 (90) | 2023.08.29 |
| 안드로이드 앱 만들기 : playstore 앱 서명 인증서 분실 등의 이슈 대처 방 (65) | 2023.08.23 |
| 안드로이드 앱 만들기 : 또 하나의 경고성 메일 (ANDROID API 수준 준수 요구사항) (10) | 2023.08.22 |
| 안드로이드 앱 만들기 : 구글에서 보낸 경고 메일 (게시 취소됨) (15) | 2023.08.21 |